RVs (recreational vehicles) help carry your picnic essentials. But these travel trailers also ensure that your family
and friends can enjoy every journey together.
What makes an RV so perfect is its flexibility to make a pit stop at any sunny, rainy, or windy spot. While your RV
awning fabric lasts many years, it does, like all fabrics, wear out with time. Eventually, you must consider the best
replacement RV awning fabric options for your recreational vehicle.
If you’re new to replacing an RV awning and wondering how to replace RV awning fabric, don’t fret. If you have one other
person to help install it, you will do just fine.
In this blog, I will help RV owners understand how to replace RV awning fabric. You’ll also learn about the entire
replacement process for worn-out RV awning fabric. With step-by-step instructions, you will no longer be a novice in
changing
RV
awning fabrics. You will also get to know the components and mechanisms of your motorhome better than ever
before.
Table Of Contents
What You Will Need
Before we get to how to replace an RV awning’s fabric, let’s list all the tools and materials you will need:
- Measuring tape
- Screw and bolt openers of varying sizes
- A temporary marker
- A helper
- New awning fabric
Step 1 — Choose a New RV Awning
Measure Your Existing Awning
To
install an awning on
an RV, you’ll need to choose and buy a new awning. However, you must get the awning’s measurement requirements
before choosing a new fabric.
To do this, hold your measuring tape from the center of one arm of your RV awning roller to the other arm, horizontally
and vertically. Don’t measure just the fabric — you’ll need a little extra room in your measurements.
Select & Buy A New Awning
Choose colors and the best replacement RV awning fabrics that suit your tastes. There are many exciting RV fabrics,
options, and models, including vinyl and acrylic on the web. You can scan through RV awning models from different
manufacturers. It’s also wise to
read awning reviews to make an
informed decision before installing replacement RV fabric.
Step 2 — Remove an Old RV Awning
Removing Arms From the RV
Roll your current awning down about a foot to get started. Then, unscrew the four bolts (two on either side) that hold
your RV arms to the side of your RV. Identify the fabric channel and the two screws holding the awning inside this
channel. Next, unscrew these screws so the old awning can slide in and out freely. Loosen out the bottom of the arms and
detach them from the RV.
Next up, walk the entire awning out of its fabric channel, and once it’s out, lay it on a platform so it’s easier to
work on.
Activate Spring Torsion Lock
Lock the spring tension on the side of the awning without the retract lever (i.e. the side without the extending
feature). Look for a small hole on the end cap and insert a screwdriver or pick to activate the spring torsion lock.
Remove the bolt holding the RV arm to the bracket and remove the arm. Take care to grip
the bracket tightly, as it
is still under torsion.
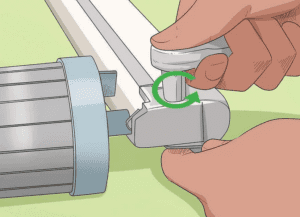
Release Torsion
Now, you must release the torsion on the awning by rolling the bracket. If the bracket remains when you remove the arm,
consider the job done. If not, you will need to temporarily replace its job by inserting a bolt through the bracket and
roller bar.
Next, gently rotate the bracket and release the tension on the roller bar. Note how many rolls you made – you’ll have to
make that many to secure the tension later.
Remove The Spring Assembly
Lastly, remove the spring assembly by removing the bolts, springs, rivets, caps, and spring assemblies. Now, you can
gently roll out the old awning. Each RV awning or toy hauler has a main section and decorative valance. Ensure you mark
which channels each rolled out from.
Step 3 — Install a New RV Awning
How to Insert Your Replacement RV Awning Fabric
Slide the valance section of your new awning into the valance channel as identified earlier. Do the same for the main
section of the awning. While sliding the valance channel, make sure the front pattern of your new awning faces the
ground.
You can use a silicone lubricant to minimize the chances of damage to the awning before sliding it in.
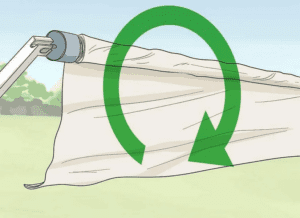
Roll The Awning Fabric & Attach RV Arms
Roll the fabric as you rolled it down earlier. Reinstall the spring assembly. Then, replace the bolts, rivets, and
springs. Rotate the bracket the same number of times you did earlier, only in the opposite direction. Reconnect the arm
and the screws.
Next, lift the arms of the awning and replace the
brackets and screws you removed
earlier on both sides.
Here is a summary of this process for reference the next time you need to reteach yourself how to replace RV awning
fabric. Some steps may vary depending on the type of travel trailer awning, the size of the RV, whether it is a fifth
wheel or any other variation.
| Step |
What To Do |
| Choose a New RV Awning |
Measure from the center of one arm to another, read reviews and check designs to choose a new awning
fabric. |
| Remove the Old RV Awning |
Unscrew the bolts on the RV arms, identify fabric channels, detach arms from the RV, activate the spring
torsion lock, release torsion, and remove the spring assembly. |
| Install New RV Awning |
Slide valance and main awning in place; roll the fabric up and reinstall spring assembly, rivets, and
springs; rotate the bracket back in place, and reconnect the arms on both sides. |
Conclusion
I hope this guide helped you learn how to replace RV awning fabric comfortably. Ensure you have a helper to provide
temporary support for the arms of the awning. If you’re looking for the best replacement RV awning fabrics that tempt
you into revamping your pop-up RV, check the reviews
on my website
to get an idea of what to look for.